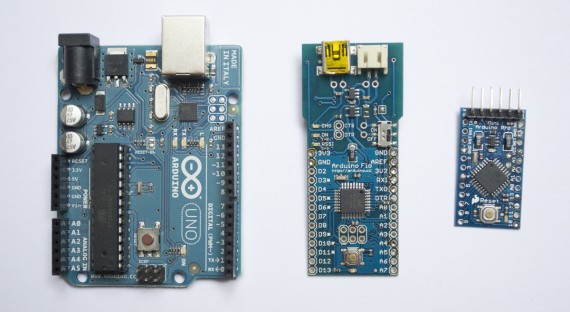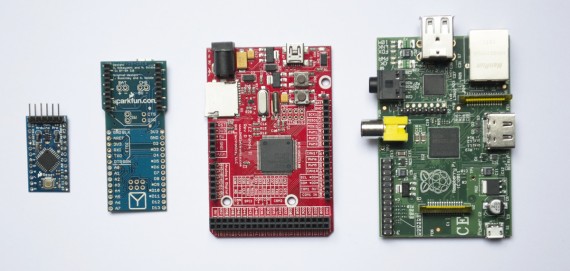
Arduino Pro Mini, Arduino Fio, FEZ Panda II (similar size as Arduino Uno) and Raspberry Pi (model B). Because I had no hardware at hand, a Gadgeteer device is not shown here.
In the past couple of years, with the development of the Arduino platform, electronic prototyping kits have gained a lot of popularity world-wide amongst hobbyists and professionals. Today, a large number of ‘electronic bricks’ such as sensors, Wi-Fi, LED modules or motors is available, for example for building robots or for home automation purposes. While planning a project for students who had never worked with electronic circuits before, I came across a number of different systems which I want to discuss briefly in this article, by presenting some major advantages and disadvantages of these systems.
Disclaimer: The comparison in the following article is based upon my own research and experiences, and represents solely my personal opinion. I am not affiliated with any of the mentioned companies.
Table of content
- Arduino
- .NET Micro Framework
- .NET Gadgeteer
- Pro’s and con’s in a nutshell
- Hardware distributors
- Further alternatives
- Conclusion
Arduino
The Arduino platform, nowadays rather presenting a family of microcontroller boards rather than a specific one, came into being about 6 years ago in Italy. An internet magazine article from May 2011, stating that there were “about 300,000+ Arduino ‘in the wild’” at that time, reveals how Arduino has become today’s probably most popular microcontroller platform.
Arduino boards are based upon 8-bit AVR microcontroller units (MCUs) produced by the US company Atmel, and appear in various form factors. The standard form-factor board, the Arduino Uno, is equipped with a series of female pin headers which can be used to attach a so-called shield to the board. A shield usually contains further electronic components and may fulfill various functions, such as providing a LCD display, a key pad, a Bluetooth module, and so on. As such, a shield can be regarded as a form of ‘electronic brick‘. Each shield, in turn, contains further female pin headers in the same arrangement as the original motherboard, such that multiple shields can be stacked on top of each other. Where a shield is not available, sensor hardware is connected directly to the pin headers via jumper cables, or soldered to the board.
The following image shows the Arduino Uno with its 4 shield headers (in black) on the left side, and two of its smaller cousins, the Arduino Fio and the Arduino Pro Mini.
Most Arduino boards can directly be connected to the computer using a plain USB cable; some require an additional serial-to-FTDI adapter in between (like the Arduino Pro Mini in above picture). The microcontrollers are usually programmable in C/C++. An integrated development environment (IDE) is available for almost all common desktop platforms (Windows, Mac OS, Linux, …). Alternatively, a special firmware (“Firmata”) can be deployed onto the controller, allowing to move the application code onto a desktop computer that is running the Java-like Processing programming language, thereby merely using the Arduino as an I/O board.
The .NET Micro Framework
The .NET Micro Framework (.NET MF) is a software development kit (SDK) along with an associated runtime environment for 32-bit microcontrollers, such as the NXP LPC 2387 or the STM32F4 Cortex M4. The framework, which integrates into Microsoft Visual Studio and thus mainly aims at Windows users, features a runtime interpreter that processes an intermediate language generated from C# or VB.NET code. It has many features of a high-level language, such as automatic memory management and garbage collection, support for multi-threading, extension methods, just-in-time debugging and overall a relatively high level of abstraction. For someone (e.g. a student) with Java background, the entry threshold is thereforely relatively low. This, in my opinion, makes embedded programming with .NET MF a real fun experience, because you are able to quickly achieve first results.
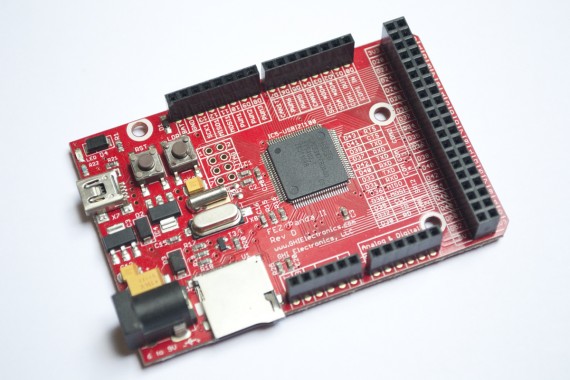
FEZ Panda II: A .NET MF microcontroller board made by GHI Electronics, Inc. (USA), with an Arduino-like form factor. Smaller versions are also available.
Being based upon a runtime that interpretes managed code, .NET MF does not possess real-time capabilities. Because the garbage collector might become active non-deterministically, single managed code calls might take up to one or two milliseconds. Yet, this is presumably still faster than executing the entire application logic on a PC and simply communicating with peripheral devices such as sensors via USB (as is done by Firmata/Processing). More importantly, the MCU can work autonomously without PC connectivity once the program has been deployed, which is not possible with Firmata.
On the other hand, for time-critical tasks such as closed-loop motor control and odometry using quadrature encoders, an AVR/Arduino-based microcontroller board might be the better choice. I found out that if interrupts are fired too frequently on a .NET MF system (say, 100 times per second), this will quickly lead to an OutOfMemoryException because each interrupt triggers an additional method invocation on the call stack. Also note that while .NET MF contains a subset of the classes present in the full .NET Framework, it currently does not support generics, or other advanced features such as LINQ.
.NET Gadgeteer
.NET Gadgeteer is a fairly new project, started in 2011 by Microsoft Research labs in Cambridge, UK. Gadgeteer aims at making electronic prototyping easier and more modular, by providing a software layer on top of the .NET Micro Framework, along with specific standards for module hardware: There are about 20 different socket types, a handful of them being the most commonly used ones. Each socket consists of 2×5 pins, with 1.27mm pitch – I found that these sockets are pretty hard to come by in small quantities, and can be fairly expensive (up to 3€ per piece). For comparison, the connectors I have been using for a similar project recently (4-pin and 2mm pitch), sell for about $0.10 each.
Most Gadgeteer hardware has initially come from Microsoft’s US launch partner GHI Electronics, but further offerings (e.g. by Sytech, Seeedstudio) are slowly emerging. Each hardware assembly usually consists of at least a base module, such as the relatively cheap FEZ Cerberus, and a power module (e.g. for power from USB). Additional modules, such as sensors, displays etc. are then connected to the base module using standardized 10-pin cables; kits containing commonly used modules are available.
Each Gadgeteer module comes with the relevant module drivers – most of them being open source, like the Gadgeteer SDK. An XML description of for instance the required socket type, and an image are also included. A visual composer that is integrated into the MS Visual Studio IDE after installing the SDK, can automatically connect the modules with the relevant mainboard sockets, thus detecting any potential conflicts before the hardware parts have even been touched:
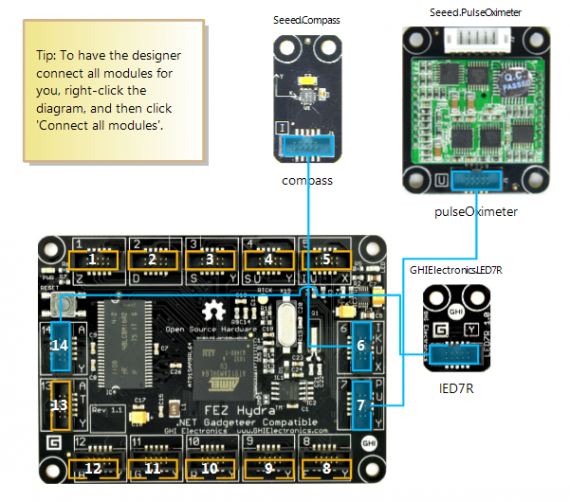
Visual composer for Gadgeteer modules, integrated into the MS Visual Studio IDE. The composer can automatically connect modules with the relevant sockets on the Gadgeteer mainboard.
In comparison to Arduino or pure .NET MF, Gadgeteer makes the hardware and software components much more modular and reusable; the visual composer simplifies the process. In my opinion, using Gadgeteer especially makes sense if only a low number of custom modules is required. One issue that I can see with the present socket types is that very simple modules might waste a lot of unused pins: For a plain LED, for example, you normally only need a single I/O pin, plus a power and a ground line. Most Gadgeteer sockets, however, provide 3 to 7 I/O pins; a large amount of them would thus stay unused because the socket would be blocked by the LED module.
To accommodate for this, the Gadgeteer designers included the principle of daisy-chaining, called “DaisyLink” and being an extension of the established I2C bus concept. This approach makes it possible to attach several not necessarily identical modules to each other (in a row), thus only blocking a single socket on the mainboard. That, however, requires additional circuitry on the individual modules, a reason why not all present modules support this feature, and makes such modules more complex and expensive.
Pro’s and con’s in a nutshell
The most important advantages (+) and disadvantages (–) of the discussed platforms, in my opinion, are:
Arduino
+ Quite cheap
+ Real-time capable (no managed code, direct hardware access)
+ Cross-platform IDE
+ Huge existing codebase
+ Lots of cheap hardware modules/shields, e.g. Seeedstudio Grove components
– C/C++ code often very low-level (bit-shifting, etc.), hard to understand initially
– No step-by-step debugging possible without major modification efforts
– Shield concept flawed: Pin conflicts between shields, shield must be directly attached to the MCU board
.NET MF
+ MCUs in about the same price range as Arduino
+ 32-bit vs. 8-bit architecture
+ Code is easier to understand, even more so for people with Java/C# background
+ JIT debugging as you are used to from a regular Windows application (no IntelliTrace, though)
+ Most Arduino hardware (e.g. Seeedstudio Grove components) can be re-used, but of course require C# code
+ Apparently good commercial support available by GHI Electronics (see tinyclr.com)
– Only officially supported under Windows/Visual Studio
– Not real-time capable
.NET Gadgeteer
+ Even easier to understand than .NET MF thanks to better VS integration, visual hardware composer
+ Excellent modular concept, very good for code and hardware re-use
+ Relatively powerful MCUs available, such as FEZ Cerberus (168 MHz processor, vs. 8-20 MHz for Arduino), although interpreted code is generally slower than unmanaged code.
– Still limited to Windows & not real-time capable
– Available hardware modules rather expensive, compared to e.g. Grove modules, and choice still limited
– Connector headers and ribbon cables relatively expensive
– 10 pins per module might be a waste of resources for simple modules like a single LED (daisy-chaining ability might mitigate this, but requires more circuitry)
Distributors
There is a large number of distributors especially for Arduino-related hardware. For example, there are Sparkfun (USA), Seeedstudio, Iteadstudio (both China) or Robotshop (USA, EU), to only name a few. .NET MF and Gadgeteer hardware can be purchased directly at the manufacturer at GHI Electronics (USA) or Seeedstudio (which, as far as I know, both have come to an agreement to cross-stock their Gadgeteer products). See also the section on Netduino in the following section. For electronic fans based in Germany, EXP-Tech seems to be a good choice.
Further alternatives
This article mainly concentrated on Arduino, the .NET Micro Framework and Gadgeteer, because these were the primary candidates that I studied for my planned student project. There are however, a few other alternatives that I want to mention briefly (in fact, the first option I am going to describe was used in the end).
Seeedstudio Grove
“Grove” is the name of an electronics prototyping series by Seeedstudio, consisting of a series of electronic bricks (modules) with a standardized 4-pin connector (VCC, GND and two signal lanes). This is a concept similar, but not identical, to Gadgeteer; the Grove components (“Twigs”) are usually cheaper and often simpler, but mainly made for Arduino. The code is not as modular, and there is no visual designer or IDE integration of any kind. The Twigs are all connected to a base shield (“Stem”) that mounts on top of the Arduino.
As described in a separate blog entry, I designed a shield for the FEZ Panda II to allow use of Grove twigs on a .NET MF system.
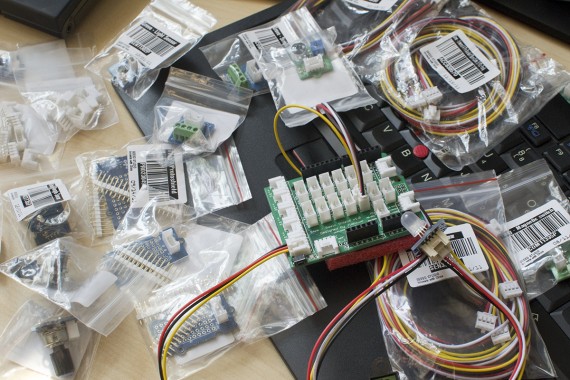
A set of components from the Grove prototyping series by Seeedstudio, with the green Base Shield in the middle.
Netduino Classic
Netduino, at first, is another hardware implementation of the .NET Micro Framework runtime. It comes in different versions, one of them having an Arduino-like form factor which should also fit the Grove base shield. Comparing the commercially offered FEZ Panda II by GHI Electronics to the classic, open-source Netduino is a different topic and out of the scope of this article; I decided for the FEZ Panda II as it offers more I/O pins, a faster MCU and some proprietary extensions such as USB Host support, runtime-loadable procedures (unmanaged code), etc.
Netduino Go
The Netduino Go (see also forum post) is an up-and-coming new project by the Netduino community; in contrast to the classic Netduino .NET MF hardware, it offers virtualization of I/O ports(!!), a compatibility mode for connection of certain Gadgeteer modules (socket types S, U and X), apparently using the same type of 1.27mm-pitch 2×5 pin sockets as Gadgeteer. The hardware is more powerful than the traditional Netduino, using a 168MHz Cortex M-4 processor as on the FEZ Cerberus Gadgeteer mainboard.
While I do not yet know very much about the brand-new Netduino Go; yet, the virtualization aspect seems very appealing and the compatibility with selected Gadgeteer modules makes it even more interesting.
Raspberry Pi
The Raspberry Pi – you have probably already heard of it – normally would not quite fit into this article, since this credit-card sized board is actually an entire PC, containing a Broadcom chip with GPU, HDMI and composite output, an RJ45 ethernet port, an SD-card reader (the FEZ Panda II also has that) and 2 USB ports. The reason I am mentioning here is that it is located in the same price range (the B model with ethernet comes for about 35 dollars), and also has has 17 GPIO pins, I2C and SPI ports on-board (see here for an application example). The Gert board makes the general-purpose I/O pins more easily accessible and adds some further ones using multiplexing.
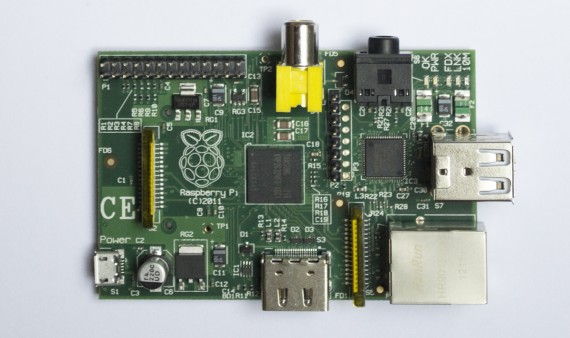
Raspberry Pi (model B). Note the HDMI and composite video connector, the 2 USB ports, the SD card reader and the RJ45 ethernet port.
The Raspberry Pi is most oftenly used with a Linux-based operating system (e.g. Debian), which per se is again no real-time operating system. While offering PC functionality that the other described systems don’t have (integrated display controller, support for a wide range of USB devices, etc.), the Raspberry Pi – same as .NET MF solutions – is therefore less apt for time-critical low-level applications such as quadrature encoder tracking.
Conclusion
All in all, choosing the right platform for your project is a tough choice. If you intend to do time-critical stuff, I would certainly recommend the Arduino route (or even use an FPGA if required). Conceptually, I find the Gadgeteer concept very intriguing, especially for students who do not have a lot of background knowledge in this field. What deters me a little from using Gadgeteer is that there are still not as many modules available as there Arduino shields or Grove Twigs, that the former are priced higher, and that due to the type of sockets used, simple modules could waste precious GPIO pins that then have to stay unused. Regarding the pricing, however, the time saved by easy code re-use and not having to deal with cabling issues might be worth that money.
For this current student project, I have therefore decided to go the .NET MF (FEZ Panda II) + Grove Twigs route; see my dedicated blog entry on the Grove Panda board I designed for bringing the two together. In the future, if things advance well, I might instead quite possibly opt for Gadgeteer, or even the Netduino Go if it is indeed as promising as it appears.
So much for now. If you have made different experiences and feel like you want to share them, or think that certain information in this article is not correct, please let me know in the comments section. Thanks for reading!
